Last Updated on August 6, 2022
Data preparation is required when working with neural networks and deep learning models. Increasingly, data augmentation is also required on more complex object recognition tasks.
In this post, you will discover how to use data preparation and data augmentation with your image datasets when developing and evaluating deep learning models in Python with Keras.
After reading this post, you will know:
- About the image augmentation API provided by Keras and how to use it with your models
- How to perform feature standardization
- How to perform ZCA whitening of your images
- How to augment data with random rotations, shifts, and flips
- How to save augmented image data to disk
Kick-start your project with my new book Deep Learning With Python, including step-by-step tutorials and the Python source code files for all examples.
Let’s get started.
- Jun/2016: First published
- Update Aug/2016: The examples in this post were updated for the latest Keras API. The datagen.next() function was removed
- Update Oct/2016: Updated for Keras 1.1.0, TensorFlow 0.10.0 and scikit-learn v0.18
- Update Jan/2017: Updated for Keras 1.2.0 and TensorFlow 0.12.1
- Update Mar/2017: Updated for Keras 2.0.2, TensorFlow 1.0.1 and Theano 0.9.0
- Update Sep/2019: Updated for Keras 2.2.5 API
- Update Jul/2022: Updated for TensorFlow 2.x API with a workaround on the feature standardization issue
For an extended tutorial on the ImageDataGenerator for image data augmentation, see:
Keras Image Augmentation API
Like the rest of Keras, the image augmentation API is simple and powerful.
Keras provides the ImageDataGenerator class that defines the configuration for image data preparation and augmentation. This includes capabilities such as:
- Sample-wise standardization
- Feature-wise standardization
- ZCA whitening
- Random rotation, shifts, shear, and flips
- Dimension reordering
- Save augmented images to disk
An augmented image generator can be created as follows:
from tensorflow.keras.preprocessing.image import ImageDataGenerator
datagen = ImageDataGenerator()
Rather than performing the operations on your entire image dataset in memory, the API is designed to be iterated by the deep learning model fitting process, creating augmented image data for you just in time. This reduces your memory overhead but adds some additional time cost during model training.
After you have created and configured your ImageDataGenerator, you must fit it on your data. This will calculate any statistics required to actually perform the transforms to your image data. You can do this by calling the fit() function on the data generator and passing it to your training dataset.
datagen.fit(train)
The data generator itself is, in fact, an iterator, returning batches of image samples when requested. You can configure the batch size and prepare the data generator and get batches of images by calling the flow() function.
X_batch, y_batch = datagen.flow(train, train, batch_size=32)
Finally, you can make use of the data generator. Instead of calling the fit() function on your model, you must call the fit_generator() function and pass in the data generator and the desired length of an epoch as well as the total number of epochs on which to train.
fit_generator(datagen, samples_per_epoch=len(train), epochs=100)
You can learn more about the Keras image data generator API in the Keras documentation.
Need help with Deep Learning in Python?
Take my free 2-week email course and discover MLPs, CNNs and LSTMs (with code).
Click to sign-up now and also get a free PDF Ebook version of the course.
Point of Comparison for Image Augmentation
Now that you know how the image augmentation API in Keras works, let’s look at some examples.
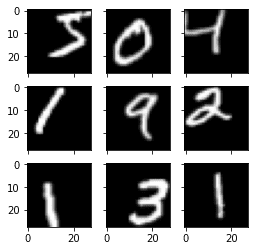
We will use the MNIST handwritten digit recognition task in these examples. To begin with, let’s take a look at the first nine images in the training dataset.
# Plot images
from tensorflow.keras.datasets import mnist
import matplotlib.pyplot as plt
# load dbata
(X_train, y_train), (X_test, y_test) = mnist.load_data()
# create a grid of 3x3 images
fig, ax = plt.subplots(3, 3, sharex=True, sharey=True, figsize=(4,4))
for i in range(3):
    for j in range(3):
        ax[i][j].imshow(X_train[i*3+j], cmap=plt.get_cmap("gray"))
# show the plot
plt.show()
Running this example provides the following image that you can use as a point of comparison with the image preparation and augmentation in the examples below.
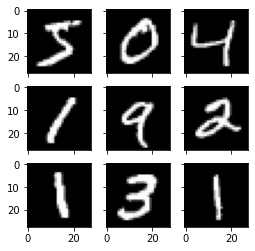
Example MNIST images
Feature Standardization
It is also possible to standardize pixel values across the entire dataset. This is called feature standardization and mirrors the type of standardization often performed for each column in a tabular dataset.
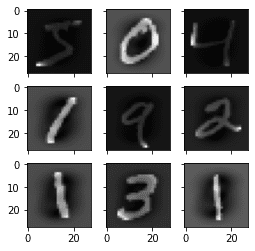
You can perform feature standardization by setting the featurewise_center and featurewise_std_normalization arguments to True on the ImageDataGenerator class. These are set to False by default. However, the recent version of Keras has a bug in the feature standardization so that the mean and standard deviation is calculated across all pixels. If you use the fit() function from the ImageDataGenerator class, you will see an image similar to the one above:
# Standardize images across the dataset, mean=0, stdev=1
from tensorflow.keras.datasets import mnist
from tensorflow.keras.preprocessing.image import ImageDataGenerator
import matplotlib.pyplot as plt
# load data
(X_train, y_train), (X_test, y_test) = mnist.load_data()
# reshape to be [samples][width][height][channels]
X_train = X_train.reshape((X_train.shape[0], 28, 28, 1))
X_test = X_test.reshape((X_test.shape[0], 28, 28, 1))
# convert from int to float
X_train = X_train.astype('float32')
X_test = X_test.astype('float32')
# define data preparation
datagen = ImageDataGenerator(featurewise_center=True, featurewise_std_normalization=True)
# fit parameters from data
datagen.fit(X_train)
# configure batch size and retrieve one batch of images
for X_batch, y_batch in datagen.flow(X_train, y_train, batch_size=9, shuffle=False):
    print(X_batch.min(), X_batch.mean(), X_batch.max())
    # create a grid of 3x3 images
    fig, ax = plt.subplots(3, 3, sharex=True, sharey=True, figsize=(4,4))
    for i in range(3):
        for j in range(3):
            ax[i][j].imshow(X_batch[i*3+j], cmap=plt.get_cmap("gray"))
    # show the plot
    plt.show()
    break
For example, the minimum, mean, and maximum values from the batch printed above are:
-0.42407447 -0.04093817 2.8215446
And the image displayed is as follows:

Image from feature-wise standardization
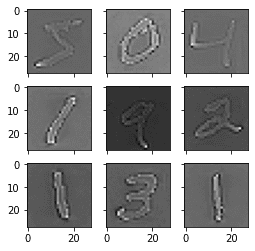
The workaround is to compute the feature standardization manually. Each pixel should have a separate mean and standard deviation, and it should be computed across different samples but independent from other pixels in the same sample. You just need to replace the fit() function with your own computation:
# Standardize images across the dataset, every pixel has mean=0, stdev=1
from tensorflow.keras.datasets import mnist
from tensorflow.keras.preprocessing.image import ImageDataGenerator
import matplotlib.pyplot as plt
# load data
(X_train, y_train), (X_test, y_test) = mnist.load_data()
# reshape to be [samples][width][height][channels]
X_train = X_train.reshape((X_train.shape[0], 28, 28, 1))
X_test = X_test.reshape((X_test.shape[0], 28, 28, 1))
# convert from int to float
X_train = X_train.astype('float32')
X_test = X_test.astype('float32')
# define data preparation
datagen = ImageDataGenerator(featurewise_center=True, featurewise_std_normalization=True)
# fit parameters from data
datagen.mean = X_train.mean(axis=0)
datagen.std = X_train.std(axis=0)
# configure batch size and retrieve one batch of images
for X_batch, y_batch in datagen.flow(X_train, y_train, batch_size=9, shuffle=False):
    print(X_batch.min(), X_batch.mean(), X_batch.max())
    # create a grid of 3x3 images
    fig, ax = plt.subplots(3, 3, sharex=True, sharey=True, figsize=(4,4))
    for i in range(3):
        for j in range(3):
            ax[i][j].imshow(X_batch[i*3+j], cmap=plt.get_cmap("gray"))
    # show the plot
    plt.show()
    break
The minimum, mean, and maximum as printed now have a wider range:
-1.2742625 -0.028436039 17.46127
Running this example, you can see that the effect is different, seemingly darkening and lightening different digits.
Standardized feature MNIST images
ZCA Whitening
A whitening transform of an image is a linear algebraic operation that reduces the redundancy in the matrix of pixel images.
Less redundancy in the image is intended to better highlight the structures and features in the image to the learning algorithm.
Typically, image whitening is performed using the Principal Component Analysis (PCA) technique. More recently, an alternative called ZCA (learn more in Appendix A of this tech report) shows better results in transformed images that keep all the original dimensions. And unlike PCA, the resulting transformed images still look like their originals. Precisely, whitening converts each image into a white noise vector, i.e., each element in the vector has zero mean and unit standard derivation and is statistically independent of each other.
You can perform a ZCA whitening transform by setting the zca_whitening argument to True. But due to the same issue as feature standardization, you must first zero-center your input data separately:
# ZCA Whitening
from tensorflow.keras.datasets import mnist
from tensorflow.keras.preprocessing.image import ImageDataGenerator
import matplotlib.pyplot as plt
# load data
(X_train, y_train), (X_test, y_test) = mnist.load_data()
# reshape to be [samples][width][height][channels]
X_train = X_train.reshape((X_train.shape[0], 28, 28, 1))
X_test = X_test.reshape((X_test.shape[0], 28, 28, 1))
# convert from int to float
X_train = X_train.astype('float32')
X_test = X_test.astype('float32')
# define data preparation
datagen = ImageDataGenerator(featurewise_center=True, featurewise_std_normalization=True, zca_whitening=True)
# fit parameters from data
X_mean = X_train.mean(axis=0)
datagen.fit(X_train - X_mean)
# configure batch size and retrieve one batch of images
for X_batch, y_batch in datagen.flow(X_train - X_mean, y_train, batch_size=9, shuffle=False):
    print(X_batch.min(), X_batch.mean(), X_batch.max())
    # create a grid of 3x3 images
    fig, ax = plt.subplots(3, 3, sharex=True, sharey=True, figsize=(4,4))
    for i in range(3):
        for j in range(3):
            ax[i][j].imshow(X_batch[i*3+j].reshape(28,28), cmap=plt.get_cmap("gray"))
    # show the plot
    plt.show()
    break
Running the example, you can see the same general structure in the images and how the outline of each digit has been highlighted.
ZCA whitening MNIST images
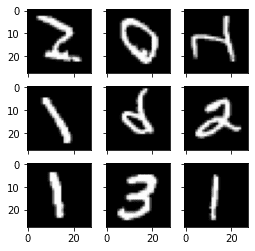
Random Rotations
Sometimes images in your sample data may have varying and different rotations in the scene.
You can train your model to better handle rotations of images by artificially and randomly rotating images from your dataset during training.
The example below creates random rotations of the MNIST digits up to 90 degrees by setting the rotation_range argument.
# Random Rotations
from tensorflow.keras.datasets import mnist
from tensorflow.keras.preprocessing.image import ImageDataGenerator
import matplotlib.pyplot as plt
# load data
(X_train, y_train), (X_test, y_test) = mnist.load_data()
# reshape to be [samples][width][height][channels]
X_train = X_train.reshape((X_train.shape[0], 28, 28, 1))
X_test = X_test.reshape((X_test.shape[0], 28, 28, 1))
# convert from int to float
X_train = X_train.astype('float32')
X_test = X_test.astype('float32')
# define data preparation
datagen = ImageDataGenerator(rotation_range=90)
# configure batch size and retrieve one batch of images
for X_batch, y_batch in datagen.flow(X_train, y_train, batch_size=9, shuffle=False):
    # create a grid of 3x3 images
    fig, ax = plt.subplots(3, 3, sharex=True, sharey=True, figsize=(4,4))
    for i in range(3):
        for j in range(3):
            ax[i][j].imshow(X_batch[i*3+j].reshape(28,28), cmap=plt.get_cmap("gray"))
    # show the plot
    plt.show()
    break
Running the example, you can see that images have been rotated left and right up to a limit of 90 degrees. This is not helpful on this problem because the MNIST digits have a normalized orientation, but this transform might be of help when learning from photographs where the objects may have different orientations.
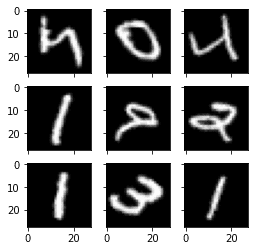
Random rotations of MNIST images
Random Shifts
Objects in your images may not be centered in the frame. They may be off-center in a variety of different ways.
You can train your deep learning network to expect and currently handle off-center objects by artificially creating shifted versions of your training data. Keras supports separate horizontal and vertical random shifting of training data by the width_shift_range and height_shift_range arguments.
# Random Shifts
from tensorflow.keras.datasets import mnist
from tensorflow.keras.preprocessing.image import ImageDataGenerator
import matplotlib.pyplot as plt
# load data
(X_train, y_train), (X_test, y_test) = mnist.load_data()
# reshape to be [samples][width][height][channels]
X_train = X_train.reshape((X_train.shape[0], 28, 28, 1))
X_test = X_test.reshape((X_test.shape[0], 28, 28, 1))
# convert from int to float
X_train = X_train.astype('float32')
X_test = X_test.astype('float32')
# define data preparation
shift = 0.2
datagen = ImageDataGenerator(width_shift_range=shift, height_shift_range=shift)
# configure batch size and retrieve one batch of images
for X_batch, y_batch in datagen.flow(X_train, y_train, batch_size=9, shuffle=False):
    # create a grid of 3x3 images
    fig, ax = plt.subplots(3, 3, sharex=True, sharey=True, figsize=(4,4))
    for i in range(3):
        for j in range(3):
            ax[i][j].imshow(X_batch[i*3+j].reshape(28,28), cmap=plt.get_cmap("gray"))
    # show the plot
    plt.show()
    break
Running this example creates shifted versions of the digits. Again, this is not required for MNIST as the handwritten digits are already centered, but you can see how this might be useful on more complex problem domains.
Random shifted MNIST images
Random Flips
Another augmentation to your image data that can improve performance on large and complex problems is to create random flips of images in your training data.
Keras supports random flipping along both the vertical and horizontal axes using the vertical_flip and horizontal_flip arguments.
# Random Flips
from tensorflow.keras.datasets import mnist
from tensorflow.keras.preprocessing.image import ImageDataGenerator
import matplotlib.pyplot as plt
# load data
(X_train, y_train), (X_test, y_test) = mnist.load_data()
# reshape to be [samples][width][height][channels]
X_train = X_train.reshape((X_train.shape[0], 28, 28, 1))
X_test = X_test.reshape((X_test.shape[0], 28, 28, 1))
# convert from int to float
X_train = X_train.astype('float32')
X_test = X_test.astype('float32')
# define data preparation
datagen = ImageDataGenerator(horizontal_flip=True, vertical_flip=True)
# configure batch size and retrieve one batch of images
for X_batch, y_batch in datagen.flow(X_train, y_train, batch_size=9, shuffle=False):
    # create a grid of 3x3 images
    fig, ax = plt.subplots(3, 3, sharex=True, sharey=True, figsize=(4,4))
    for i in range(3):
        for j in range(3):
            ax[i][j].imshow(X_batch[i*3+j].reshape(28,28), cmap=plt.get_cmap("gray"))
    # show the plot
    plt.show()
    break
Running this example, you can see flipped digits. Flipping digits is not useful as they will always have the correct left and right orientation, but this may be useful for problems with photographs of objects in a scene that can have a varied orientation.
Randomly flipped MNIST images
Saving Augmented Images to File
The data preparation and augmentation are performed just in time by Keras.
This is efficient in terms of memory, but you may require the exact images used during training. For example, perhaps you would like to use them with a different software package later or only generate them once and use them on multiple different deep learning models or configurations.
Keras allows you to save the images generated during training. The directory, filename prefix, and image file type can be specified to the flow() function before training. Then, during training, the generated images will be written to the file.
The example below demonstrates this and writes nine images to a “images” subdirectory with the prefix “aug” and the file type of PNG.
# Save augmented images to file
from tensorflow.keras.datasets import mnist
from tensorflow.keras.preprocessing.image import ImageDataGenerator
import matplotlib.pyplot as plt
# load data
(X_train, y_train), (X_test, y_test) = mnist.load_data()
# reshape to be [samples][width][height][channels]
X_train = X_train.reshape((X_train.shape[0], 28, 28, 1))
X_test = X_test.reshape((X_test.shape[0], 28, 28, 1))
# convert from int to float
X_train = X_train.astype('float32')
X_test = X_test.astype('float32')
# define data preparation
datagen = ImageDataGenerator(horizontal_flip=True, vertical_flip=True)
# configure batch size and retrieve one batch of images
for X_batch, y_batch in datagen.flow(X_train, y_train, batch_size=9, shuffle=False,
                                     save_to_dir='images', save_prefix='aug', save_format='png'):
    # create a grid of 3x3 images
    fig, ax = plt.subplots(3, 3, sharex=True, sharey=True, figsize=(4,4))
    for i in range(3):
        for j in range(3):
            ax[i][j].imshow(X_batch[i*3+j].reshape(28,28), cmap=plt.get_cmap("gray"))
    # show the plot
    plt.show()
    break
Running the example, you can see that images are only written when they are generated.
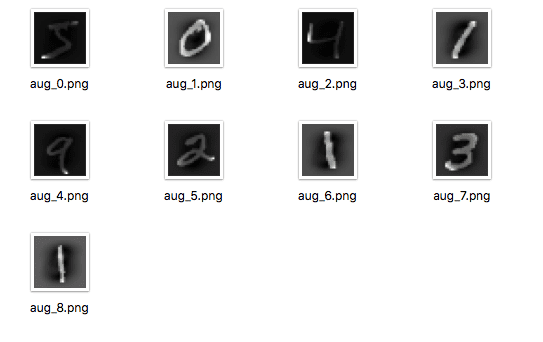
Augmented MNIST images saved to file
Tips for Augmenting Image Data with Keras
Image data is unique in that you can review the data and transformed copies of the data and quickly get an idea of how the model may perceive it.
Below are some tips for getting the most from image data preparation and augmentation for deep learning.
- Review Dataset. Take some time to review your dataset in great detail. Look at the images. Take note of image preparation and augmentations that might benefit the training process of your model, such as the need to handle different shifts, rotations, or flips of objects in the scene.
- Review Augmentations. Review sample images after the augmentation has been performed. It is one thing to intellectually know what image transforms you are using; it is a very different thing to look at examples. Review images both with individual augmentations you are using as well as the full set of augmentations you plan to use. You may see ways to simplify or further enhance your model training process.
- Evaluate a Suite of Transforms. Try more than one image data preparation and augmentation scheme. Often you can be surprised by the results of a data preparation scheme you did not think would be beneficial.
Summary
In this post, you discovered image data preparation and augmentation.
You discovered a range of techniques you can use easily in Python with Keras for deep learning models. You learned about:
- The ImageDataGenerator API in Keras for generating transformed images just in time
- Sample-wise and Feature-wise pixel standardization
- The ZCA whitening transform
- Random rotations, shifts, and flips of images
- How to save transformed images to file for later reuse
Do you have any questions about image data augmentation or this post? Ask your questions in the comments, and I will do my best to answer.
The post Image Augmentation for Deep Learning with Keras appeared first on Machine Learning Mastery.